Creating a Tenant in OpenText Directory Services (OTDS) 22.1 and Later
A tenant in OpenText Directory Services (OTDS) is a logical partition within the OTDS environment – think of it as vertically scaling, where each tenant operates independently in a single OTDS environment, providing isolated contexts for managing authentication, authorization, and directory services. Deploying tenants allows the ability to share the OTDS environment across many OpenText environments, minimizing the footprint of your environment architecture.
Managing multiple OTDS servers can be complex and costly. By utilizing tenants, we can significantly reduce the number of servers required and streamline configurations. This not only cuts down on maintenance and operational costs but also simplifies the overall IT landscape. Fewer servers mean less complexity, which translates to easier management and more efficient use of resources.
For example, we use tenants to share an OTDS environment with Development and Test environments, reducing the number of OTDS servers and configurations that need to be maintained. Another scenario for using tenants is when customers require completely separate Production environments for different organizational divisions. This approach ensures consistency and streamlined management, making it attractive to both technical teams and program managers who oversee budget allocations and project implementations.
Starting with OTDS 22.1, OpenText transitioned tenant creation to the REST API. As a result, tenant creation is no longer possible via the command line on the OTDS server.
This article explains how to create a new tenant from the OTDS Swagger UI.
Accessing the REST API for Tenant Creation
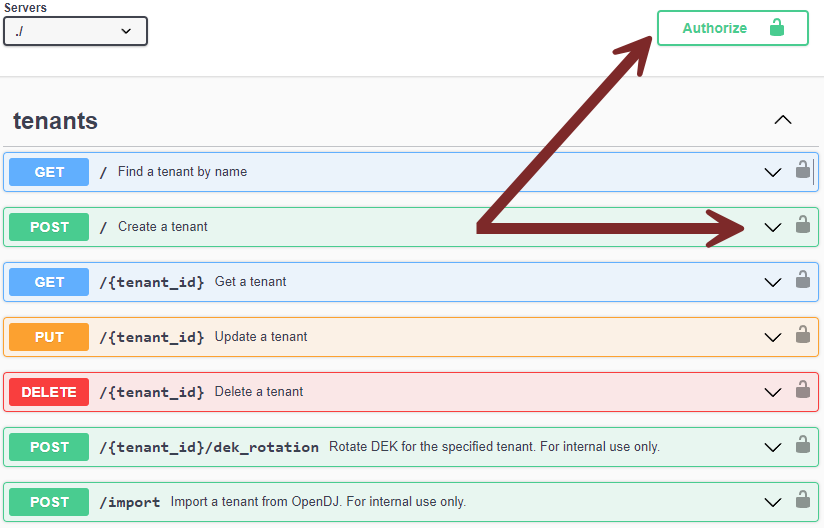
To create a new tenant, access the Swagger UI of your OTDS installation through the following URL:
http(s)://<otds_server>:<port_number>/otdsws/tenantsOnce in the Swagger UI, expand the “tenants” section and the “Post / Create a tenant” section to retrieve the necessary syntax for creating a new tenant in your OTDS installation.
In order to execute a command, first you must authenticate by clicking the “Authorize” button with admin rights: otadmin@otds.admin
Example of Creating a New Tenant

The command is executed by selecting the “Try it out” button. Execute the following JSON to create a new tenant named “Development”:
{
  "id": "development",
  "displayName": "Development",
  "adminUserName": "otadmin@otds.admin",
  "adminPassword": "Livelink",
  "tenantType": 0
}
After executing this command in the Swagger UI, the new tenant will be accessible from your OTDS installation at:
http(s)://<otds_server>:<port_number>/otdstenant/development/otds-adminTenant Types (tenantType parameter)
When creating a tenant, it’s important to understand the different tenant types available:
- 0: System Tenant
- A completely independent tenant, equivalent to a separate OTDS installation. This is likely the type you require unless otherwise directed.
- A completely independent tenant, equivalent to a separate OTDS installation. This is likely the type you require unless otherwise directed.
- 1: Inheriting Tenant
- Used with specific deployment scenarios. Inheriting tenants adopt certain settings from the system (default) tenant, such as:
- Token signing and encryption keys
- Globally scoped authentication handlers
- System attributes
- Globally scoped OAuth clients
- Used with specific deployment scenarios. Inheriting tenants adopt certain settings from the system (default) tenant, such as:
- 2: Organizational Tenant (for internal use only)
Conclusion
By following the steps outlined above, you can create new tenants in your OTDS installation using the REST API. This article aims to provide supplementary information to assist with tenant administration due to the discontinuation of the Tenant Management Guide by OpenText. Refer to KB0634709 section 5; Tenant Management API.
If you have follow-up questions or need help with your OTDS installation, please reach out here: techquestions@nanavaticonsulting.com